
Light, Optics and Optical Phenomenon
Think about the moment you wake up in the morning and switch on the light. In that very instant, something remarkable happens — energy shoots across your room at 3,00,000 kilometres per second, hits the walls, bounces back, enters your eyes, and your brain says, “Good morning!” That invisible genius at work? That is light.
Light is a form of electromagnetic radiation that is visible to the human eye and is responsible for the sense of sight. It does not need any medium to travel — it can zip through the vacuum of space (which is precisely how sunlight reaches us 150 million km away in about 8 minutes!).
Characteristics of Light
Dual Nature — Wave-Particle Duality
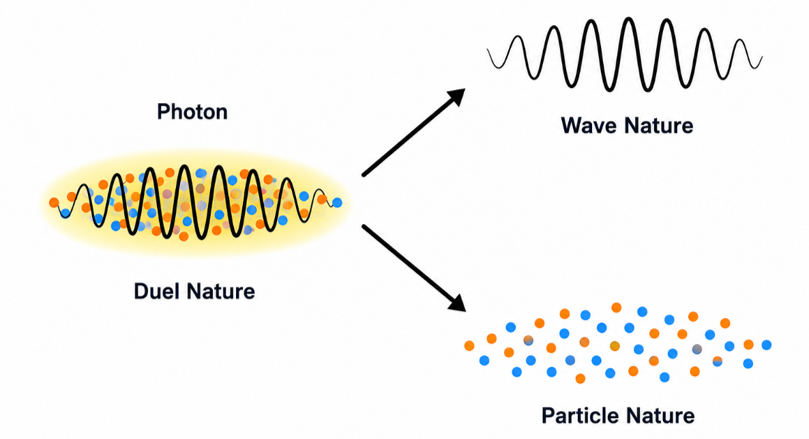
Here is the most philosophically puzzling fact about light: it is both a wave AND a particle at the same time. This is called Wave-Particle Duality.
Imagine a person who is sometimes introverted and sometimes extroverted depending on the social situation — light is exactly like that, except it changes its personality based on the experiment you run!
As a Wave: Light shows reflection, refraction, diffraction, and interference — classic wave behaviours.
As a Particle (Photon): Light shows the Photoelectric Effect — where it kicks electrons out of metals like billiard balls, which only a particle can do.
As an Electromagnetic Wave: Light is a transverse wave — its oscillating electric and magnetic fields are perpendicular to each other AND to the direction of propagation. Think of it like a flag waving sideways while the wind blows forward.
Speed and Spectrum
Light is the ultimate speed champion of the universe — in vacuum, it travels at exactly 3×10⁸ m/s (3,00,000 km/s).
However — and this is crucial — light slows down when it enters a denser medium like glass or water. This slowing is precisely what causes refraction (more on that later).
The key relationship to remember is:
Speed of Light = Wavelength × Frequency
The visible spectrum — the range of light our eyes can detect — runs from 400 nm (violet, shortest wavelength, highest frequency) to 700 nm (red, longest wavelength, lowest frequency). Beyond these limits lie ultraviolet (UV) and infrared (IR), invisible to us but very real in nature.
Reflection of Light
You look in the mirror every morning and see yourself — but have you ever wondered why? That is the magic of reflection.
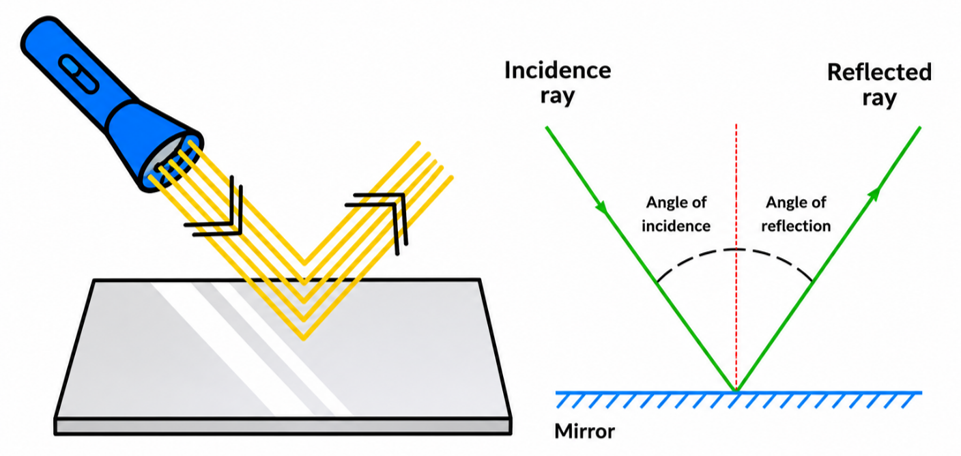
Reflection of light is the phenomenon where light rays strike a surface and bounce back. The surface acts like a well-trained doorman — it sends the light right back the way it came (well, almost — with a predictable geometric twist).
Key Terms to Know
- Incident Ray — The incoming ray of light heading toward the surface.
- Reflected Ray — The ray that bounces back after striking the surface.
- Normal — An imaginary line perpendicular (90°) to the surface at the point of incidence. Think of it as a “reference line.”
- Angle of Incidence (i) — Angle between the incident ray and the normal.
- Angle of Reflection (r) — Angle between the reflected ray and the normal.
The Two Laws of Reflection
These two laws are simple, elegant, and absolutely non-negotiable in nature:
- First Law: The angle of incidence is ALWAYS equal to the angle of reflection. (i = r). No exceptions. Nature is fair here!
- Second Law: The incident ray, the reflected ray, and the normal all lie in the SAME plane. They never play in three different planes — it is always one flat, shared plane.
Types of Reflection
Regular Reflection (Specular Reflection)
When light falls on a smooth, polished surface like a mirror or calm water, all reflected rays are perfectly parallel. This gives you a clear, sharp image. This is called Specular Reflection.
You see yourself clearly in a mirror because of this.
Irregular Reflection (Diffuse Reflection)
When light falls on a rough or uneven surface like a wall, road, or unpolished wood, the reflected rays scatter in all directions. No clear image is formed — but this is actually WHY we can see non-luminous objects from all angles!
A wall is visible from every corner of a room precisely because of diffuse reflection.
Mirrors — Flat, Curved, and Clever 😊
A mirror is a smooth, reflective surface that forms an image. Before diving into the types, let us nail down the vocabulary.
Key Concepts of Mirrors
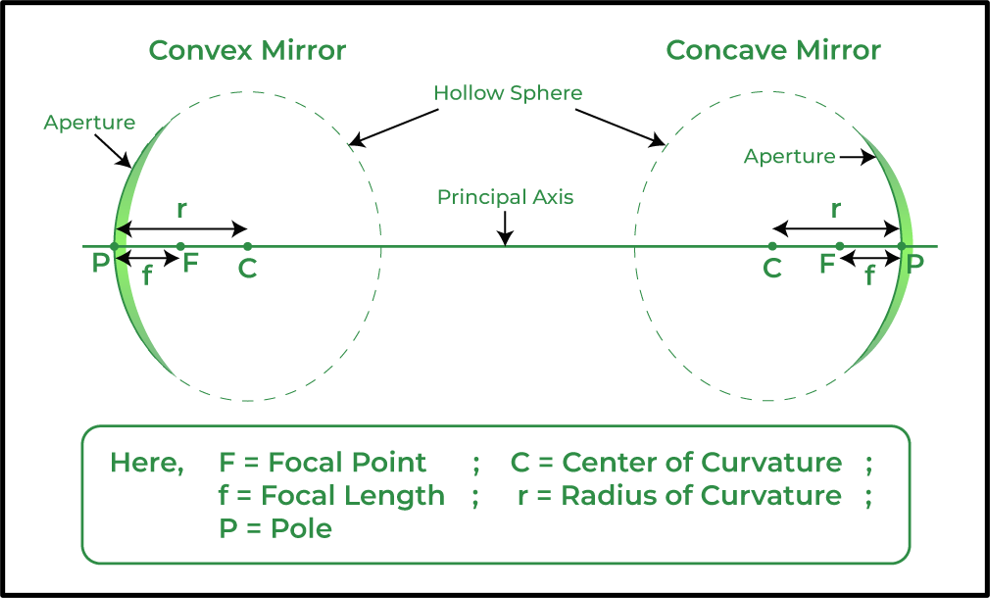
- Pole (P) — The geometric centre of the reflecting surface.
- Centre of Curvature (C) — The centre of the imaginary complete sphere of which the mirror is a part.
- Radius of Curvature (R) — Distance from the pole (P) to the centre of curvature (C). R = 2F.
- Principal Axis — A straight line passing through the pole and the centre of curvature.
- Principal Focus (F) — The point on the principal axis where parallel rays converge (concave) or appear to diverge from (convex) after reflection.
- Focal Length (f) — Distance from the pole to the principal focus. f = R/2.
- Aperture — The effective diameter of the reflecting surface.
[ Mirror Equation] 1/f = 1/v + 1/u (where v = image distance, u = object distance)
(A) Plane Mirror — The Humble Everyday Mirror
You use a plane mirror every day. Its surface is completely flat. The images it forms have these four fixed properties — memorise them:
- Virtual and Erect (upright) — the image is behind the mirror, you cannot project it on a screen.
- Laterally Inverted — left becomes right and right becomes left. Try raising your right hand — the mirror image raises its LEFT hand!
- Same Size — the image is exactly as large as the object.
- Image distance = Object distance — if you stand 2 m from the mirror, your image appears 2 m behind it.
Uses: Everyday bathroom mirrors, periscopes (used in submarines), kaleidoscopes.
(B) Concave Mirror — The Converging Mirror
Imagine the inside of a spoon facing you — that curved-in surface is a concave mirror. It is called a converging mirror because parallel rays of light, after striking it, converge (meet) at the focal point. This ability to concentrate light makes it very powerful — literally.
Uses: Shaving/makeup mirrors (magnified image when object is between F and P), dental mirrors, reflectors in flashlights and headlights, reflecting telescopes, solar furnaces, and satellite dish antennas.
Image Formation by Concave Mirror
| Position of Object | Position of Image | Nature | Orientation | Size |
| (a) At Infinity | At the Focus (F) | Real | Inverted | Highly Diminished |
| (b) Beyond C | Between F and C | Real | Inverted | Diminished |
| (c) At C | At C | Real | Inverted | Same Size |
| (d) Between C and F | Beyond C | Real | Inverted | Magnified |
| (e) At F | At Infinity | Real | Inverted | Highly Magnified |
| (f) Between F and P | Behind the Mirror | Virtual | Erect (Upright) | Magnified |
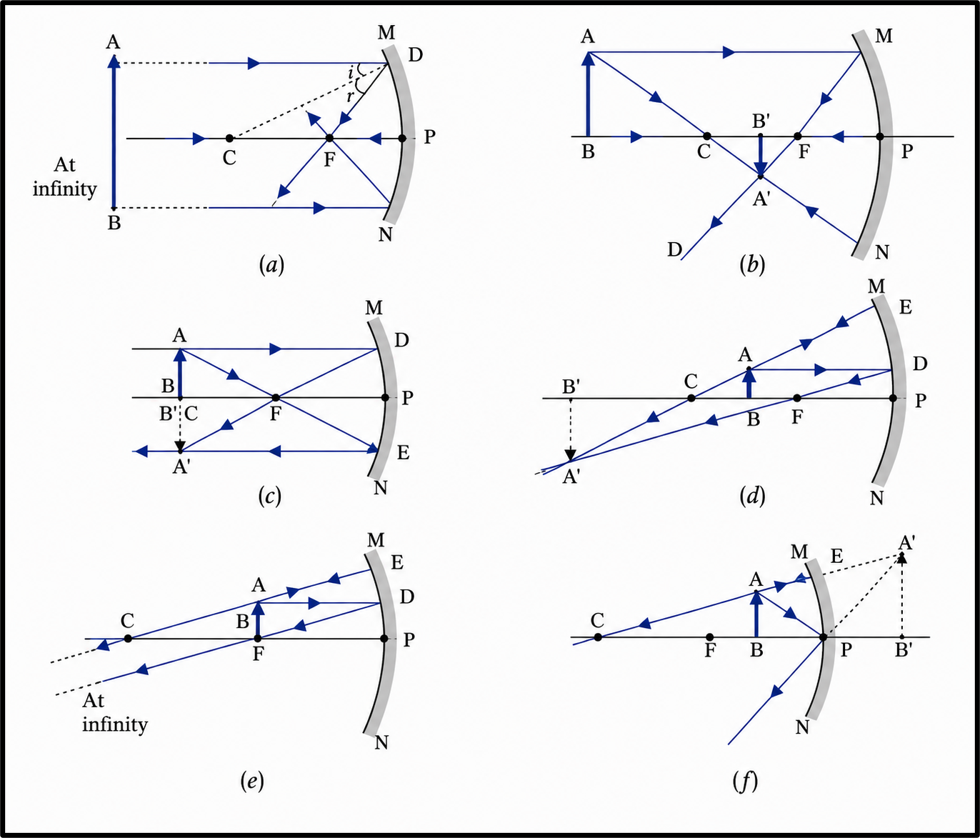
[ Memory Trick] “When object is between F and P — the image goes BEHIND the mirror and is Virtual, Erect, Magnified.” This is the only case of a virtual image in concave mirrors!
(C) Convex Mirror — The Diverging Mirror
Now imagine the outer, bulging surface of the same spoon — that is a convex mirror. Parallel rays hitting it diverge (spread apart) after reflection. The image ALWAYS appears to come from behind the mirror, making it virtual. This mirror never forms a real image.
Its image is ALWAYS: Virtual + Erect (upright) + Diminished (smaller than object).
Uses: Vehicle side mirrors and rear-view mirrors (“Objects in mirror are closer than they appear” — because the image is diminished!), security mirrors in shops, traffic junction mirrors.
Convex mirrors are used as rear-view mirrors because they give a wider field of view — you can see more of the road behind in a smaller mirror.
Magnification
Magnification tells us how big or small the image is compared to the object:
[ Formula]
Magnification (m) = Image Height / Object Height = Image Distance (v) / Object Distance (u)
m > 1 → Image is magnified (larger than object)
m < 1 → Image is diminished (smaller than object)
m = 1 → Image is the same size as the object
m is positive → Virtual, erect image
m is negative → Real, inverted image
Types of Images — Real vs. Virtual
After all this mirror talk, it is important to distinguish clearly between the two types of images.
| Feature | Real Image | Virtual Image |
| Formation | Rays actually converge at the image point | Rays appear to diverge FROM the image point |
| Orientation | Inverted (upside down) | Erect (right side up) |
| Screen? | CAN be captured on a screen | CANNOT be captured on a screen |
| Example | Image on cinema screen / retina of the eye | Image seen in a plane mirror or convex mirror |
Refraction of Light
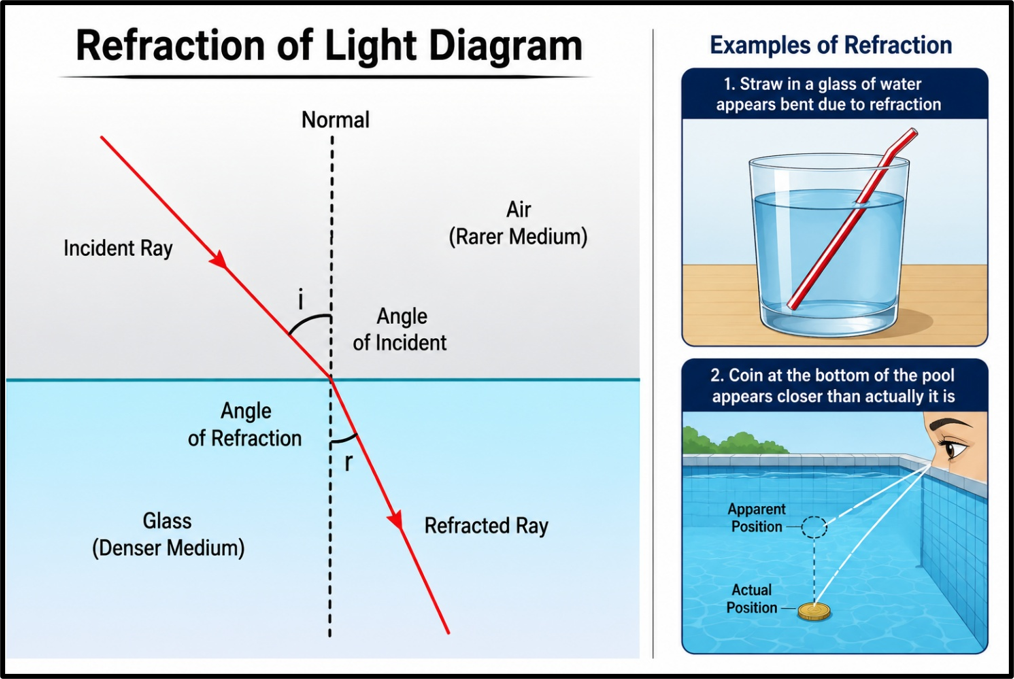
Have you ever put a straw in a glass of water and noticed it looks “bent” at the water surface? Or seen a coin at the bottom of a pool appear closer than it actually is? This is refraction at work.
Refraction of light is the bending of light as it passes from one medium into another with a different refractive index.
The bending occurs because light changes its speed when it moves from one medium to another. Think of it like a car moving from a smooth highway onto a rough gravel road — it slows down, and if it hits the boundary at an angle, it changes direction too.
Key Terms
- Incident Ray — The ray approaching the boundary between two media.
- Refracted Ray — The ray that enters the second medium and bends.
- Angle of Incidence — Angle the incident ray makes with the normal.
- Angle of Refraction — Angle the refracted ray makes with the normal.
Characteristics of Refraction
- Change in Speed: Light is fastest in vacuum. It slows down in denser media.
- Bending Towards Normal: When entering a denser medium, light bends TOWARDS the normal (e.g., air → glass).
- Bending Away from Normal: When entering a rarer medium, light bends AWAY from the normal (e.g., glass → air).
- No Refraction: If light enters perpendicular to the surface (along the normal), it passes straight through — no bending.
- Frequency stays constant during refraction; wavelength changes.
[ Analogy] A marching band crossing from grass to mud at an angle: the side that hits the mud first slows down, causing the whole band to pivot — that pivot is refraction!
Laws of Refraction
- First Law: The incident ray, refracted ray, and the normal all lie in the SAME plane.
- Second Law (Snell’s Law): sin(i) / sin(r) = Constant = Refractive Index of medium 2 relative to medium 1.
[ Snell’s Law] sin i / sin r = n₂/n₁ = Refractive Index
Refractive Index
The Refractive Index (n) of a medium tells us how much it slows down light — and therefore how much it bends light. The higher the refractive index, the denser the medium optically, and the more light bends when entering it.
[Formula] n = Speed of light in vacuum (c) / Speed of light in medium (v)
| Material | Refractive Index (n) |
| Vacuum | 1.000 |
| Air | 1.0003 |
| Water | 1.33 |
| Glass (Typical) | 1.50 |
| Diamond | 2.42 |
[ Fun Fact] Diamond has the highest refractive index among common materials (2.42). This is why it sparkles so brilliantly — it traps and bends light more than any other gem!
Total Internal Reflection (TIR)
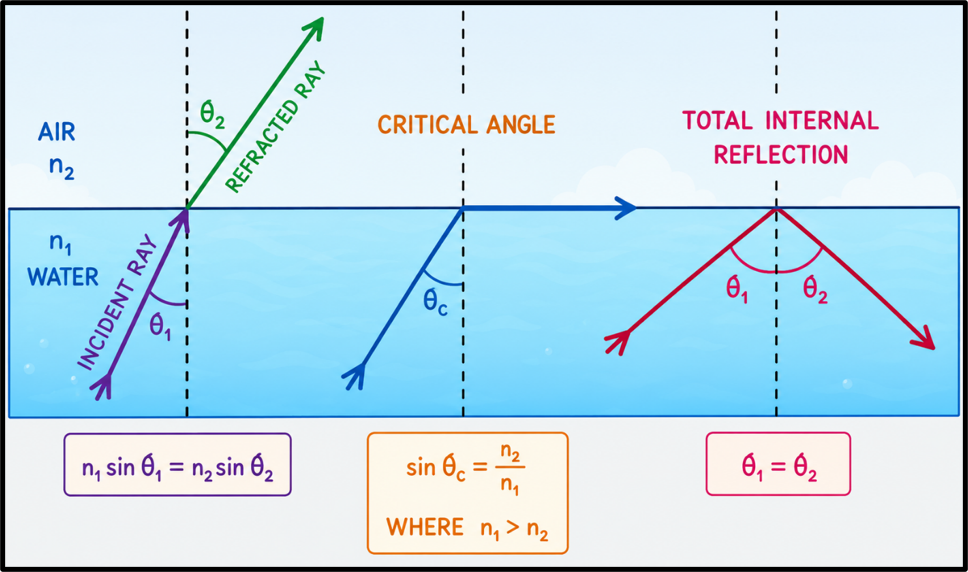
Now here is a phenomenon that sounds like a paradox — light that refuses to leave a medium.
When light travels from a denser medium (like glass) to a rarer medium (like air), and the angle of incidence exceeds a specific angle called the Critical Angle, the light stops refracting and instead bounces completely back inside the denser medium. This is Total Internal Reflection.
Critical Angle: The angle of incidence (in the denser medium) at which the angle of refraction in the rarer medium becomes exactly 90°.
Condition for TIR: Light must travel from denser → rarer medium AND angle of incidence must be GREATER than the critical angle.
Applications of Total Internal Reflection
- Optical Fibre / Fibre Optics: Light signals travel through glass fibres by bouncing off the inner walls via TIR, enabling high-speed internet and medical endoscopy.
- Diamond Sparkle: Diamond’s high refractive index (2.42) gives it a critical angle of only ~24.5°. Most light entering a diamond undergoes TIR, causing brilliant sparkle.
- Prisms: Periscopes, binoculars, and reflectors use prisms that reflect light via TIR (instead of mirrors, which lose more light).
- Mirages: A natural TIR phenomenon in the atmosphere.
Mirage — Nature’s Greatest Optical Illusion
Have you ever driven on a hot summer road and seen what looks like a shimmering pool of water far ahead, only for it to vanish as you approach?
That is an Inferior Mirage — one of nature’s most spectacular optical tricks, caused entirely by refraction and (sometimes) total internal reflection of light in layers of the atmosphere.
A mirage is an optical phenomenon caused by the refraction of light through air layers of different temperatures and densities. The result is an illusion where objects appear displaced — sometimes below their actual position, sometimes above it.
Types of Mirages
(A) Inferior Mirage (Most Common)
- Where: Hot surfaces — desert roads, tarmac on sunny days.
- How: Ground heats up → air just above the ground becomes very hot and less dense (lower refractive index) → air higher up is cooler and denser (higher refractive index). Light from the sky bends UPWARD through these layers and reaches your eye from below — making the SKY appear to be on the GROUND, like a pool of water.
- Result: The image appears BELOW the actual object.
(B) Superior Mirage
- Where: Cold surfaces — typically over large water bodies or polar regions.
- How: Temperature inversion — cold air near the surface, warm air above. Light bends DOWNWARD, making objects appear to float ABOVE their actual position.
- Result: The image appears ABOVE the actual object.
- Special forms: Looming Effect (object appears elevated), Fata Morgana (complex stacked, distorted images seen in polar regions).
Lenses — Transparent Architects of Light
A lens is a transparent optical device (usually made of glass) that refracts light to either converge it (bring it together) or diverge it (spread it apart). Lenses are the workhorses of the optical world — from the spectacles on your nose to the telescope on a spacecraft.
There are two fundamental types: Convex (Converging) Lenses and Concave (Diverging) Lenses.
Key Terms for Lenses
- Principal Axis: Straight line through the centre of the lens, perpendicular to its surfaces.
- Optical Centre (O): The central point of the lens through which light passes without bending.
- Focus (F): The point where refracted rays converge (convex) or appear to diverge from (concave). A convex lens has a REAL focus; a concave lens has a VIRTUAL focus.
- Focal Length (f): Distance from the optical centre to the focus. Positive for convex, negative for concave.
- 2F (Centre of Curvature): Points at twice the focal length on either side of the lens.
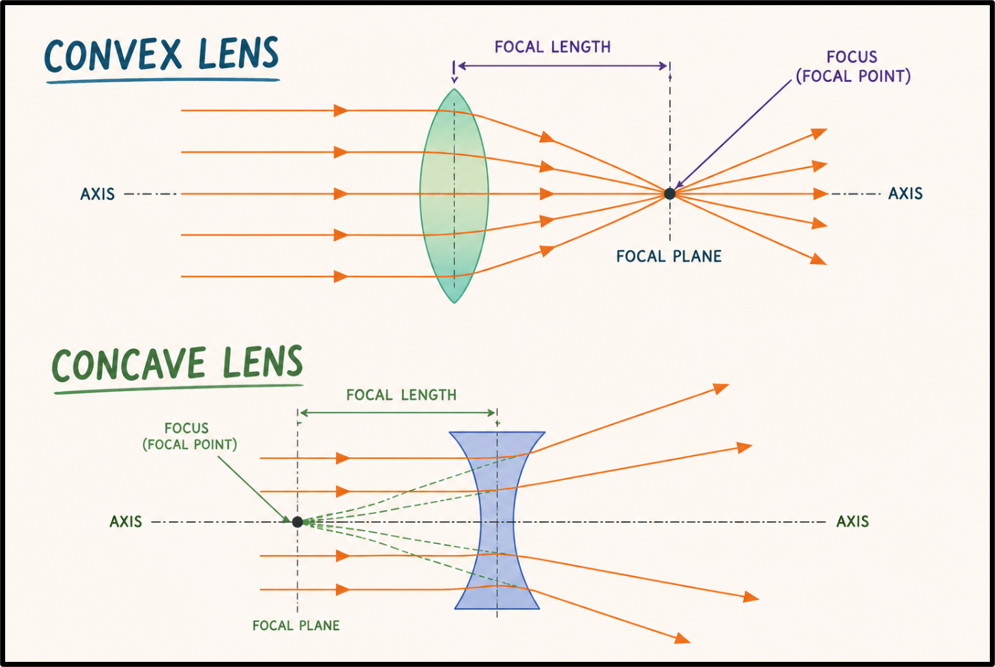
(A) Convex Lens — The Converging Lens
A convex lens is thicker in the middle than at the edges. It bends light rays inward, converging them to a real focal point. Think of using a magnifying glass to focus sunlight onto paper to start a fire — that is a convex lens at work!
Power: Positive (+).
The more curved the lens, the shorter its focal length and the more powerful it is.
Applications: Magnifying glasses, cameras (to focus light on the sensor), microscopes (objective and eyepiece), telescopes, and correcting Hyperopia (farsightedness).
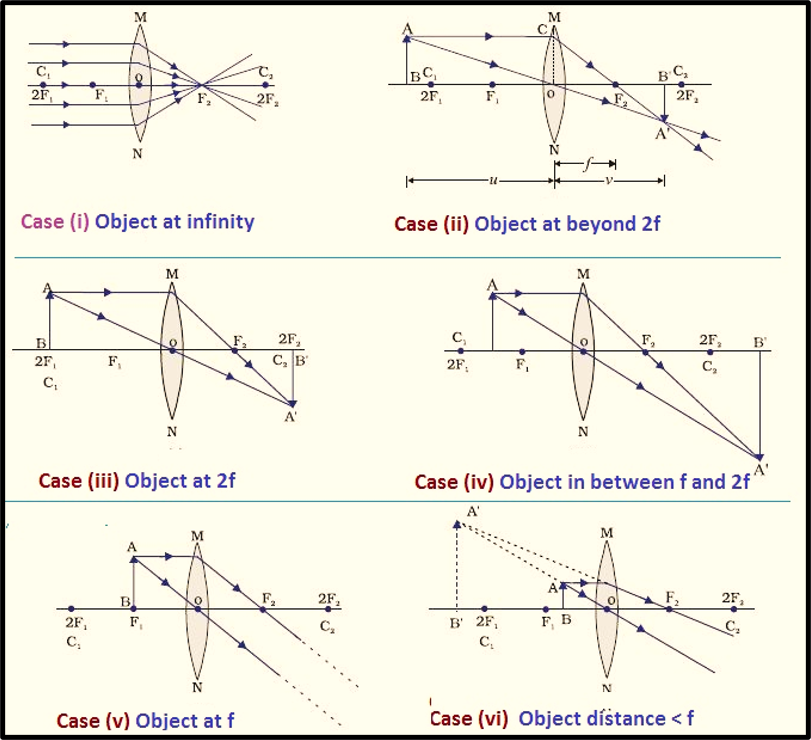
Image Formation by Convex Lens
| Object Position | Image Position | Nature of Image | Size |
| (i) At Infinity | At F₂ | Real, Inverted | Highly Diminished |
| (ii) Beyond 2F₁ | Between F₂ and 2F₂ | Real, Inverted | Diminished |
| (iii) At 2F₁ | At 2F₂ | Real, Inverted | Same Size |
| (iv) Between F₁ and 2F₁ | Beyond 2F₂ | Real, Inverted | Magnified |
| (v) At F₁ | At Infinity | No Image | No Image |
| (vi) Between F₁ and Lens | Same side as object | Virtual, Erect | Magnified |
(B) Concave Lens — The Diverging Lens
A concave lens is thinner in the middle than at the edges. It always diverges light rays — spreading them apart. The image it forms is ALWAYS virtual, erect, and diminished — no exceptions.
Power: Negative (–).
Applications: Correcting Myopia (nearsightedness), in combination with convex lenses in camera systems, and in peepholes (door viewers).
Power of a Lens
The Power of a lens is its ability to converge or diverge light. A lens with a shorter focal length bends light more sharply — hence it has more power.
[Formula] Power (P) = 1 / Focal Length (in metres) | Unit: Dioptre (D)
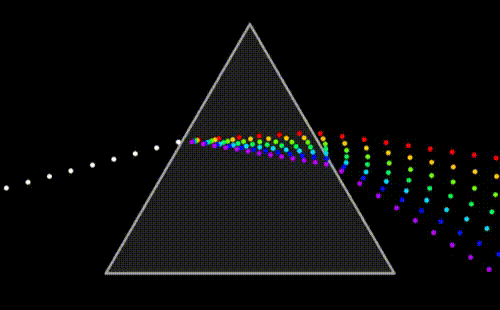
Dispersion of Light — VIBGYOR Unveiled
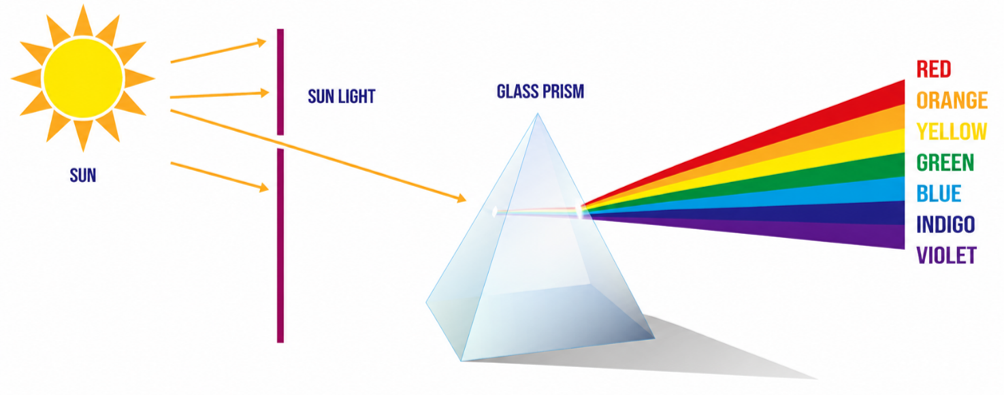
You must have seen a prism split white light into a beautiful rainbow of colours — Red, Orange, Yellow, Green, Blue, Indigo, Violet (VIBGYOR). This is Dispersion of Light.
But WHY does this happen? This is the question an examiner might frame in many creative ways.
Dispersion occurs because white light is not a single colour — it is a mixture of all visible wavelengths. When white light enters a medium like glass, each colour (wavelength) has a slightly different refractive index. Different refractive index means different bending. Different bending means different exit angles. The result: colours separate!
Principles of Dispersion
- Violet light has the SHORTEST wavelength → HIGHEST refractive index → bends the MOST.
- Red light has the LONGEST wavelength → LOWEST refractive index → bends the LEAST.
- This is called Chromatic Dispersion — different wavelengths travel at different speeds in a medium.
- Materials with high dispersion power (like flint glass) spread the spectrum wider than those with low dispersion power (like crown glass).
[ Memory Hook] VIBGYOR — Violet bends most, Red bends least. V comes first in bending, R comes last!
Rainbow — Nature’s Greatest Light Show
A rainbow is the most spectacular natural demonstration of dispersion, refraction, and internal reflection — all happening inside millions of tiny water droplets suspended in the air. Let us trace the journey of a single ray of sunlight through a raindrop:
- Refraction (Entry): Sunlight enters the water droplet, slowing down and bending.
- Dispersion: As it bends, the white light separates into its constituent colours (each refracts at a slightly different angle).
- Total Internal Reflection: The separated colours hit the inner surface of the droplet and reflect back inside.
- Refraction (Exit): As the colours exit the droplet, they bend again, enhancing the separation further.
The rainbow appears as an arc because only droplets at a specific angle (about 40°–42° from the anti-solar point) send the refracted light toward your eye. The order is always: Red on the outside (outermost arc), Violet on the inside (innermost arc).
Scattering of Light
Scattering of light is the process by which small particles in a medium cause light to deviate from its straight-line path in all directions. When light hits a tiny particle in the atmosphere, it does not just bounce off in one direction — it flies off in every direction, like a billiard ball hitting a cluster of balls.
There are three types of scattering, and they depend on the SIZE of the scattering particles relative to the wavelength of light:
(A) Rayleigh Scattering — The Blue Sky Explained
When scattering particles are MUCH SMALLER than the wavelength of light (like gas molecules in the atmosphere), the scattering follows the Rayleigh formula.
Crucially, shorter wavelengths (blue, violet) scatter FAR more than longer wavelengths (red, orange). The scattering intensity is proportional to 1/λ⁴ — so blue (~450 nm) scatters about 5.5 times more than red (~700 nm)!
Blue Sky: Gas molecules scatter blue light much more than red. Your eye receives blue light from all directions in the sky, so the sky appears blue.
Red/Orange Sunsets and Sunrises: Near the horizon, sunlight travels through a much thicker slice of atmosphere. Blue and violet are scattered away completely. Only long-wavelength red and orange survive the journey — hence the warm colours of dawn and dusk.
Distant Mountains Appear Blue: Blue light scattered by atmospheric particles between you and the mountains makes them look bluish-hazy.
(B) Mie Scattering — White Clouds and Haze
When particles are COMPARABLE IN SIZE to the wavelength of light (like water droplets in clouds and fog), scattering is approximately equal for all wavelengths. There is no colour preference.
The result: white light scatters as white. This is why clouds appear white and fog appears white/grey.
- Clouds and Fog: Water droplets (~1–10 µm) scatter all colours equally → white appearance.
- Hazy Atmosphere: Larger dust and pollution particles cause Mie scattering, reducing visibility.
- Halos around the sun/moon: Caused by Mie scattering combined with refraction through ice crystals.
(C) Non-Selective Scattering — Large Particle Scattering
When particles are MUCH LARGER than the wavelength of light, all wavelengths scatter equally — no wavelength dependence at all. The name says it all: “non-selective.”
Large water droplets in dense clouds → all colours scattered equally → white or grey appearance.
Large dust particles reduce visibility without changing colour.
Comparison: Types of Scattering
| Feature | Rayleigh Scattering | Mie Scattering | Non-Selective Scattering |
| Particle Size | Much SMALLER than λ | Comparable to λ | Much LARGER than λ |
| Wavelength Dependence | Strongly dependent (∝ 1/λ⁴) | Weakly dependent | Wavelength-independent |
| Scattering Direction | Uniform (all directions) | Primarily forward | Uniform |
| Examples | Blue sky, red sunsets, distant blue mountains | White clouds, fog, haze, halos | Dense clouds, fog, large dust particles |
Tyndall Effect — Seeing the Invisible Path of Light
The Tyndall Effect is scattering of light by particles in a colloidal mixture (a suspension of fine particles in a medium). It makes the path of a light beam VISIBLE — you can trace the beam through the air. The particle size must be large enough to scatter light but small enough to stay suspended.
- Sunlight streaming through a dusty room → you can see the “beam” of sunlight.
- Milk in water → a colloidal suspension; shine a flashlight and you see the path.
- Car headlights in fog → the beam is visible because fog droplets scatter the light.
- Laser pointer in a smoky room → the laser beam’s path is clearly visible.
- Clouds → water droplets/ice crystals in the atmosphere scatter sunlight → Tyndall Effect.
[ Important Distinction] The BLUE SKY is due to Rayleigh Scattering, NOT the Tyndall Effect. Do not confuse them
Diffraction of Light
Diffraction is the bending of light waves around the edges of an obstacle or through a narrow opening, causing the light to spread out. This is a purely wave behaviour — particles do not diffract, only waves do.
It is the reason you can hear sound around a corner (sound waves diffract easily) but not see around a corner (light wavelengths are very small, so diffraction is minimal in everyday life).
Key Conditions for Diffraction
The size of the opening or obstacle must be COMPARABLE TO or smaller than the wavelength of light for noticeable diffraction.
The smaller the opening relative to the wavelength, the MORE the light spreads (diffracts).
[ Everyday Example] The fringes (bright and dark bands) seen around the edges of shadows are caused by diffraction. Compact disc (CD) surfaces act as diffraction gratings — reflecting white light as rainbow colours.
Polarization of Light — Taming the Wild Wave
Normal (unpolarized) light from the sun, a bulb, or a torch vibrates in ALL directions perpendicular to its direction of travel — imagine a skipping rope being shaken randomly in all planes.
Polarized light, on the other hand, vibrates in ONLY ONE specific plane — like shaking the rope only up and down.
In technical terms: Unpolarized light has its electric field oscillating in many directions. Polarized light has its electric field oscillating in only ONE plane. Polarization is achieved by filtering (using a Polaroid filter), reflection, or scattering.
Applications of Polarization
- Polaroid Sunglasses: Block horizontally polarized glare from roads and water surfaces. Only vertically polarized light passes through, dramatically reducing glare.
- 3D Movies: Two images are projected with perpendicular polarizations. Each eye sees only one image through polarized glasses, creating the illusion of depth.
- Photography: Polarizing filters cut reflections and enhance sky contrast in photos.
- LCD Displays: Liquid Crystal Displays in TVs, computers, and smartphones use polarized light controlled by liquid crystals to produce images pixel by pixel.
- Stress Analysis: Engineers use polarized light to detect stress fractures in transparent materials — stressed regions rotate polarized light differently.
Interference of Light — When Waves Collaborate (or Clash)
When two or more light waves meet, they interact — this is Interference. The waves can either reinforce each other (if they meet in step, “in phase”) or cancel each other out (if they meet out of step, “out of phase”). This is one of the most powerful proofs that light is a wave.
Types of Interference
- Constructive Interference: Crest meets crest + trough meets trough → LARGER amplitude → BRIGHTER light. The waves ADD UP.
- Destructive Interference: Crest meets trough → amplitude cancels → DIMMER or NO light. The waves CANCEL OUT.
[ Real-World Example] The beautiful iridescent colours on a soap bubble or an oil film on water are caused by interference! Light reflecting from the top and bottom surfaces of the thin film interferes — constructively for some wavelengths (those colours appear bright) and destructively for others (those colours disappear).
Defects of Vision — When the Eye’s Optics Go Wrong
The human eye is itself an extraordinary optical instrument — with a convex lens (the eye’s crystalline lens) that focuses images onto the retina (the “screen” at the back of the eye). But this system can malfunction.
When it does, we get the common vision defects.
| Defect | Problem | Cause | Effect on Retina | Correction |
| Myopia (Near-sightedness) | Cannot see distant objects clearly | Elongated eyeball or excess cornea curvature | Image forms IN FRONT of retina | Concave Lens (–ve power) |
| Hyperopia (Far-sightedness) | Cannot see nearby objects clearly | Short eyeball or insufficient cornea curvature | Image forms BEHIND retina | Convex Lens (+ve power) |
| Astigmatism | Blurred/distorted vision at all distances | Uneven (asymmetric) shape of cornea or lens | Light focuses unevenly on retina | Cylindrical Lens |
| Presbyopia | Age-related: difficulty focusing on close objects | Loss of lens elasticity + weakening of ciliary muscles | Reduced accommodation | Bifocal / Progressive Lenses |
| Cataract | Blurred or dim vision | Aging, diabetes, UV exposure; protein clumps in lens | Light scattered/blocked before retina | Surgery: artificial intraocular lens |
| Night Blindness (Nyctalopia) | Cannot see in dim light or darkness | Vitamin A deficiency; rod cell dysfunction | Rod cells in retina fail to function | Vitamin A supplementation |
Understanding Each Defect — Simplified
Myopia (Near-sightedness) — “I can only see near”
Think of a myopic eye as a camera whose lens is too strong or the film (retina) is too far back — the image of distant objects forms in front of the retina before it can reach the screen.
To fix this, we use a concave (diverging) lens to push the focal point backward onto the retina.
Hyperopia (Far-sightedness) — “I can only see far”
The hyperopic eye is the opposite — the lens is too weak or the eyeball is too short. The image of nearby objects would form behind the retina.
We use a convex (converging) lens to pull the focal point forward onto the retina.
Astigmatism — “Everything is a bit stretched and blurry”
The cornea is shaped like a rugby ball rather than a perfect sphere — it has different curvatures in different planes. Light rays in the horizontal plane focus at a different point than those in the vertical plane.
Cylindrical lenses (which curve in only one axis) correct this by adding power in only the defective direction.
Presbyopia — “The Aging Eye”
After age 40, the crystalline lens gradually loses its ability to change shape (accommodation). You find yourself holding your phone farther and farther away to read!
Bifocal lenses solve this — the top portion corrects distance vision, the bottom portion corrects near vision.
Colour Blindness — The Cone Cell Problem
The retina has two types of photoreceptors: rod cells (for dim light, black-and-white vision) and cone cells (for bright light and colour vision). Colour blindness results from a genetic defect in one or more types of cone cells. The most common form is red-green colour blindness.
There is no complete cure, but special colour-corrective lenses can enhance colour differentiation for some sufferers.